
MontanaWorks Help Page
MontanaWorks Job Seeker Portal
-
How do I create a MontanaWorks Job Seeker account?
Note: If you do not already have a login.mt.gov Okta account, one will be created for you automatically upon submission of your MontanaWorks Job Seeker Registration.
If you already have an Okta account and register as a Job Seeker using the same email address, you will use your existing Okta credentials to sign in.
- Open the MontanaWorks Job Seeker Portal
- Select 'Register as Job Seeker'
- Complete fields on the Quick Registration screen as applicable to identify you in the Job Seeker Portal. (* indicates a required field)
- If you had already been working with a Job Service Office and know your Individual ID #, you may enter it - this is not required!
- Click 'Submit'
- If information that you entered conflicts with information that Job Service had had from working with you previously, you will be prompted to contact DLIWSDcustomersupport@mt.gov for assistance
- If successful, a "Success!"; message will appear with the option to return to the Job Seeker Portal page
-
How do I change my name and/or email address?
Changes to your name and/or email address on your MontanaWorks Job Seeker Portal, Business Portal, or WOTC Portal account can only be updated by you through your Okta account. These changes made in Okta will automatically apply to your MontanaWorks account upon your next Portal login.
Please see https://okta.mt.gov/help for more information.
-
What is a "Workforce Case"?
When you access Job Service Montana services, a Workforce Case with a unique number is created in your MontanaWorks account. Each Workforce Case represents one continuous period of interactions. Once there’s a break in activity, the current Workforce Case closes but a new one will be created the next time you access services. This may result in multiple Workforce Cases for you under one account. By default, the most recent Workforce Case’s details will display in your Job Seeker Portal once you have logged in, but you may also view the details of your previous Workforce Cases there.
-
How do I view & manage my Job Seeker Portal account?
- 1. After logging in to your Job Seeker Portal, click your name in the top-right corner.
- Select ‘My Account’
- The following fields are view-only, not editable here:
- Individual ID, a number automatically assigned to your account
- Name and/or email address can only be updated through your Okta account
- Date of birth and Social Security Number – if corrections need to be made, please contact your Career Coach at Job Service Montana
- You may edit any other details on this screen, including your contact information.
- Click ‘Submit’ to save your changes OR
- Click ‘Cancel’ to leave this screen without saving changes
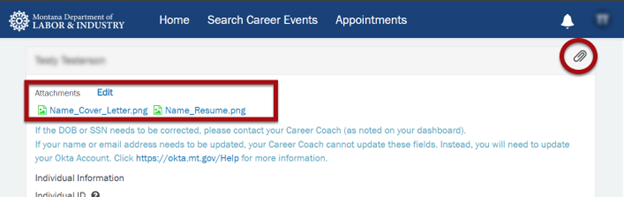
- To upload a file to your account, such as resume or cover letter:
- Click the paperclip icon in the upper right corner to add attachments
- Use the file picker to select your file to upload
- To view files attached to your account, click the name of the file toward the top of the My Account screen. A file preview will open in a new tab of your browser
- To remove a file attached to your account:
- Click ‘Edit’
- Click the ‘X’ to the right of an attachment to remove it. This cannot be undone, and attachments removed cannot be recovered
-
How do I navigate my homepage/dashboard?
- On the MontanaWorks Job Seeker Portal page, select ‘Login as Job Seeker’
- Select ‘Citizen Login’ and log in using your Okta account
Top Menu

- Home: Select this option at any time while in the Job Seeker Portal to be brought back to your home screen, aka dashboard.
- Search Career Events: Select to navigate the Career Events Screen, where you can search and register for events hosted by Job Service offices or businesses and organizations throughout Montana.
- Appointments: Select to view all your upcoming or past appointments with Job Service Montana Offices, or to request a new in-person or virtual appointment. You can also view them by clicking the ‘My Appointments’ section on your home screen.
Home Page Sections
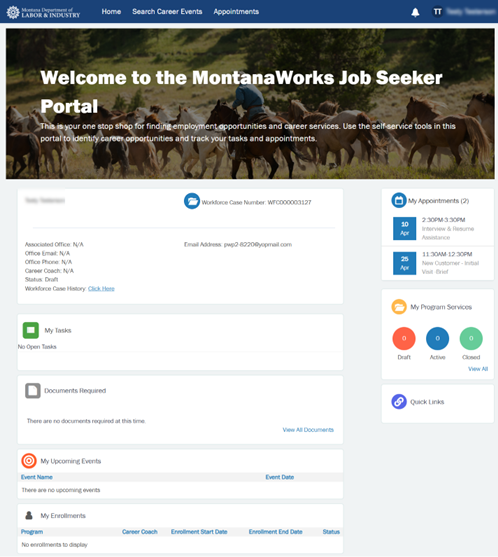
Your Workforce Case
In this section, you will be able to view:
- The ID Number and details of your selected Workforce Case. By default, this will show your most recent Workforce Case, but you may use Workforce Case History to select a previous Workforce Case you had with Job Service Montana, if applicable, to view its details instead.
- The Job Service Office associated with your Workforce Case and contact information for that office.
- If you have a Career Coach associated with your selected Workforce Case, their name. Note that you may work with multiple staff members, but only one will display here.
My Tasks
On your current Workforce Case, if applicable, this section will display any tasks that have been assigned by your Career Coach or Case Manager for you to complete in the Job Seeker Portal. When viewing previous Workforce Case(s), no tasks will display here.
Documents Required
On your current Workforce Case, if applicable, this section will display any documents that your Career Coach or Case Manager requested you upload for a specific verification purpose.
You may select ‘View All Documents’ in the lower right corner of this section to view all verification documents you or your Case Manager have uploaded for the selected Workforce Case.
Note that if your Career Coach or Case Manager asked you to upload a file such as a resume to review, those kinds of non-verification documents do not get uploaded in this section. Instead, please see 'How do I upload files for my Career Coach to review?' for more information.
My Upcoming Events
On your current Workforce Case, if applicable, this section will display upcoming events that you are registered for.
If you are registered for more than five (5) upcoming events, you may select ‘View All’ in the lower right corner of this section to see all your event registrations.
My Enrollments
This section will display a summary of your program enrollments under the selected Workforce Case.
Wagner-Peyser refers to the Wagner-Peyser Act of 1933 which established the network of employment offices that are now known as the American Job Center network, including Job Service Montana. Source
Wagner-Peyser ‘enrollment’ here simply indicates that you have received services from Job Service Montana
If you have one or more WIOA program enrollment(s), it will show in this section with the ‘Career Coach’ displayed as the Case Manager that initially enrolled you into the program.
My Appointments
Up to two upcoming appointments you have with Job Service Montana will show in this section. If you have more than two upcoming appointments, a page link will appear to view all upcoming appointments
Note: you may also use ‘Appointments’ in the top menu to view your upcoming appointments as well
My Program Services
Used for individuals who have been enrolled in WIOA Programs
To see all funding expenditures (Program Services) recorded under the currently selected Workforce Case, select ‘View all’ in the lower right corner
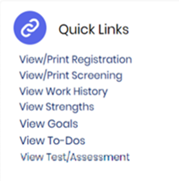
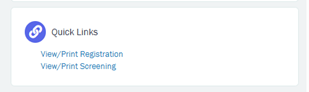
Quick Links
As applicable to the selected Workforce Case, the following links will allow you to view additional details of your Workforce Case
-
How do I find and register for events?
- After logging in to your Job Seeker Portal account, select ‘Search Career Events’ in the top menu
- You will be able to search for events by County, Event Name, or Distance from your associated Job Service Office. After choosing any desired search criteria, click ‘Search’
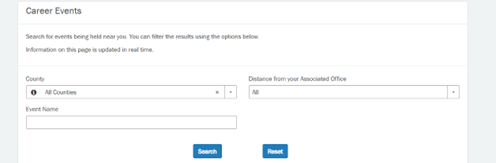
- Upcoming events matching your search criteria will appear as tiles, displaying
- Organization name
- Event name
- Whether you have already registered for that event
- Event date
- Time slot
- Event location
- Remaining availability
- Click ‘Register’ on an event and time slot you would like to attend
- Click ‘Enroll’ to continue with your registration
- Your selected event will now show under the ‘My Upcoming Events’ section of your Job Seeker Portal home page. Select the event name there to view its details
- You will also receive a confirmation email
If your event registration, time slot, or event are cancelled, you will receive a cancellation notice via email.
-
How do I request an appointment with Job Service Montana?
- Log in to your Job Seeker Portal account
- Click ‘Appointments’ in the top menu
- Click ‘New’
- Complete information as applicable, then click ‘Next’
- If you request an In Person Appointment, you will be taken to the Choose Location screen to find a Job Service Montana office served by the county you select
- If you request a Virtual Appointment you will be taken directly to the Preferred Day and Time screen
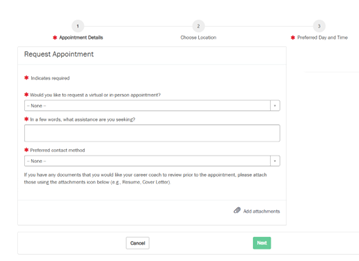
- When finished, click ‘Submit’ to send your appointment request to Job Service Montana
- If successful, a “Success!” message will appear with the option to return to the Job Seeker Portal page
- Note that the appointment will not appear on your list of scheduled appointments until a Career Coach has confirmed the appointment
-
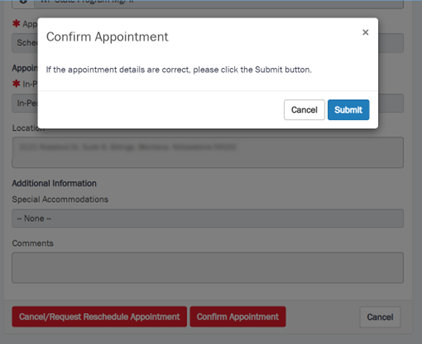
How do I confirm an appointment with Job Service Montana?
If you received an email from MontanaWorks asking you to confirm your scheduled appointment with Job Service Montana, note that you may attend your appointment and receive services without needing to create or use the Job Seeker Portal.
If you choose to use the Job Seeker Portal:
- Log in to your Job Seeker Portal account
- Click the appointment’s date to open it
- At the bottom of the appointment, if the details are correct, click ‘Confirm Appointment’
- On the Confirm Appointment popup, click ‘Submit’ to notify the Career Coach of your confirmation
-
How do I reschedule or cancel an appointment with Job Service Montana?
- Log in to your Job Seeker Portal account
- Click the appointment’s date to open it, either:
- From the ‘My Appointments’ section of your Job Seeker Portal home page
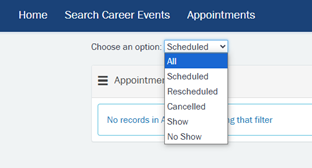
- From the ‘Appointments’ top menu option. By default, all appointments in ‘Scheduled’ status will display. To see appointments that had been rescheduled or past appointments, use the ‘Choose an option’ dropdown to change the set of appointments shown.
- At the bottom of the appointment selected, click the red ‘Cancel/Request Reschedule Appointment’ button
- Choose to either Cancel Appointment or Request Reschedule
- Cancel Appointment: upon your confirmation of the cancellation, the appointment will be cancelled and the Career Coach for that appointment will be notified
- Note: if you had been selected for RESEA and this is your RESEA Appointment, you will NOT be able to cancel it here. Please contact your Career Coach to discuss your circumstances
- Request Reschedule: your request will be sent to the Career Coach that the appointment had been scheduled with. After they review your request and find a new available time that works for both of you, they will modify the appointment and that change will appear in your Job Seeker Portal
- Cancel Appointment: upon your confirmation of the cancellation, the appointment will be cancelled and the Career Coach for that appointment will be notified
-
How do I view my appointment(s) with Job Service Montana?
- Log in to your Job Seeker Portal account
- If you have upcoming appointment(s):
- On the ‘My Appointments’ section of your Job Seeker Portal home page, up to two (2) upcoming appointments will display at a time
- If you have more than two upcoming appointments, a link to view all upcoming appointments will appear in this section
- Click the ‘Appointments’ top menu option
- By default, all appointments in ‘Scheduled’ status will display
- To see appointments that had been rescheduled or past appointments, use the ‘Choose an option’ dropdown to change the set of appointments shown

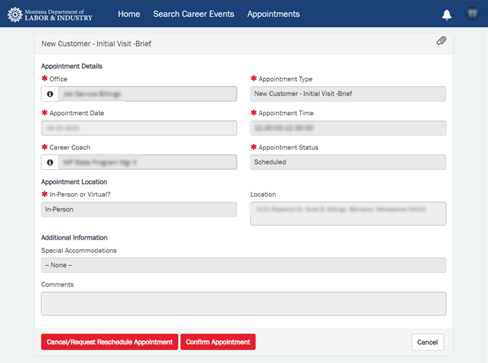
- Click an appointment’s date to open its details, including:
- Any comments left on the appointment by your Career Coach
- If the appointment is virtual, the virtual appointment details
- Any attached files on the appointment
-
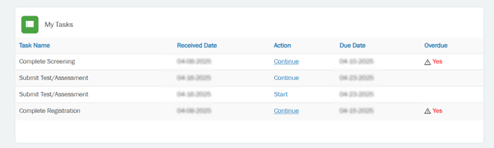
How do I complete my assigned tasks?
My Tasks
- Log in to your Job Seeker Portal
- If you have been assigned a task, it will show in the ‘My Tasks’ section of your home page
- Click ‘Start’ or ‘Continue’ next to the task that you would like to work on
- After the task has been completed, click ‘Submit’
- Once successfully completed, the task will no longer show in your ‘My Tasks’
Complete Registration or Complete Screening
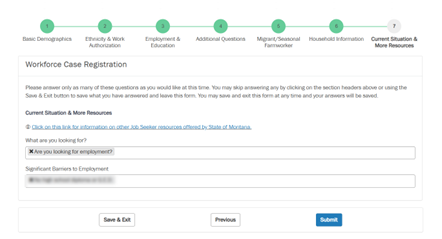
- The fields will prefill with information you provided during the Job Seeker Quick Registration (e.g., your address) as well as any information a Career Coach has recorded from previous interactions
- You may click ‘Save & Exit’ at the bottom of the task to save your answers and come back to them later
- Job Service Montana staff will NOT be able to see your saved answers until you answer all questions marked with an asterisk ( * ) and submit the task
- Answer the questions that you choose, to help Job Service Montana learn more about you and how to assist you
- You may click on the page names to jump between them, or use the ‘Next’ and ‘Previous’ buttons to navigate
- If you have answered all questions necessary for submission, click the ‘Submit’ button on the last page
- Once Registration or Screening have been completed by either you or a Career Coach, those answers will be available to you to view or print from the Quick Links section of your home page. Any further edits will need to be entered by a Career Coach
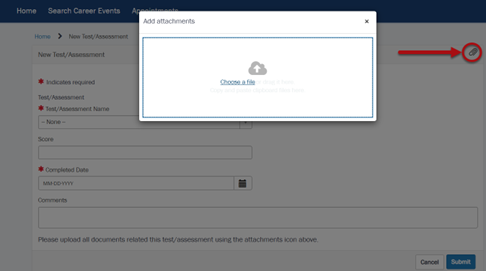
Submit Test/Assessment
- Open the ‘Submit Test/Assessment’ task
- Use the paperclip icon in the upper right corner of the appointment’s details screen to select your test/assessment results file to add
- Complete fields as applicable
- Click ‘Submit’ to finish this task
-
How do I upload files or verification documents?
There are four ways to upload a file in the Job Seeker Portal.
Upload files to your account whenever you would like using Methods 1-3; under ‘My Account’ or on an appointment, whichever is most convenient for you.
Method 4 is only used to respond to a specific verification document request from your Case Manager.
Method 1: ‘My Account’
Best for attaching files such as resumes or cover letters
- From your Job Seeker Portal Home screen, click your name in the top-right corner and select ‘My Account’
- Click the paperclip icon in the upper right corner to add attachments
- Use the file picker to select your file to upload
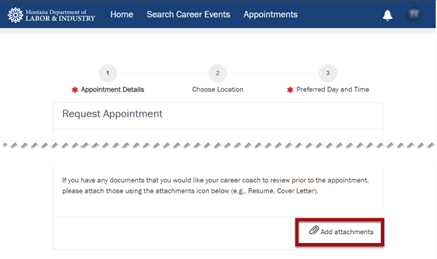
Method 2: Attach to an Appointment Request
Best for specific files that you would like to discuss at an appointment with a Career Coach
When requesting a new appointment:
- On the appointment Details Click the paperclip icon labeled ‘Add attachments’
- Select the file from your device
- Finish submitting the appointment request
Method 3: Attach to an Upcoming Appointment
For specific files that you would like to discuss at an upcoming appointment with a Career Coach
If you have an upcoming appointment scheduled:
- Click the appointment to open it
- Use the paperclip icon in the upper right corner of the appointment’s details screen to select the attachment to add
Method 4: Upload Requested Verification Document
ONLY used when your Career Coach or Case Manager has requested that you upload a document for a specific verification purpose, typically during enrollment into a WIOA Program.
- Log in to your Job Seeker Portal home page
- Scroll down to the Documents Required section
- If any documents have been requested for you to upload, those requests will show here
- Click ‘Upload’ next to the document type that you want to submit
- Select an image file or PDF (e.g., .jpg, .png, .pdf). Other file types such as Word (.docx) or Excel (.xlsx) are not supported
- Click ‘Submit’
- Your newly uploaded document will have a status of ‘Pending’ until your Career Coach or Case Manager has reviewed it
-
How do I view my Individualized Employment Plan (IEP) or (ISS) and my to-dos?
- If your Career Coach or Case Manager has recorded any of the following, you may view them under the Quick Links section of your Job Seeker Portal account for the selected Workforce Case
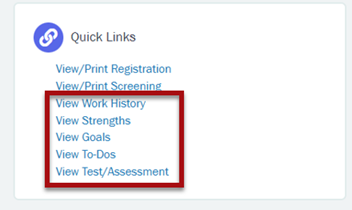 If no items had been recorded in any of these categories for the selected Workforce Case, these links will not show under Quick Links
 - Click on one of these categories to view a list of all items of that type
- For example, click ‘View To-Dos’
- For example, click ‘View To-Dos’
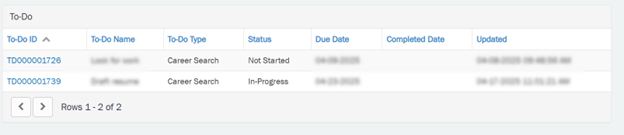
- Click on a specific item ID to view its details, including any comments left by your Career Coach or Case Manager
- Example To-Do item
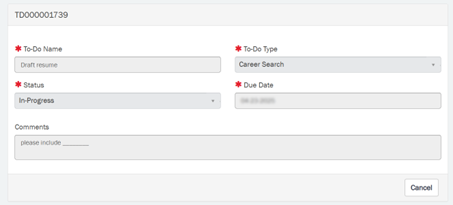
- Example To-Do item
- If you have completed a To-Do item, let your Career Coach know the next time you check in with them and they will update the item!
- If your Career Coach or Case Manager has recorded any of the following, you may view them under the Quick Links section of your Job Seeker Portal account for the selected Workforce Case
-
How do I find additional Job Seeker resources?
For additional information about assistance available to Montana job seekers for skills development opportunities and job search assistance services, please see https://wsd.dli.mt.gov/job-seeker/
MontanaWorks Business Portal
-
How do I create a MontanaWorks Business Portal account?
Check if Your Business or Organization is Already in MontanaWorks
- If your business or organization has worked with the Montana Department of Labor & Industry’s Workforce Services Division recently, please contact the staff you have worked with or email DLIWSDcustomersupport@mt.gov to get connected to your business’ existing MontanaWorks account
- Before attempting to log in, if you aren’t sure if your business is registered with MontanaWorks, you may use the Search Organization section on the MontanaWorks Business Portal page
- If your business or organization is found to be already registered, please contact DLIWSDcustomersupport@mt.gov to be connected to it
Register a Business or Organization that is New to MontanaWorks
- Open the MontanaWorks Business Portal
- Select ‘Register Your Organization’
- Select ‘Citizen Login’
- Log in using your Okta account
- Note that the email address used to associate you with your business or organization must be unique within MontanaWorks; each Okta account can only be used to access one MontanaWorks Business Portal account. An Okta account and email address used in the MontanaWorks Business Portal cannot be the same as those used in the MontanaWorks Job Seeker Portal
- If you do not yet have an Okta account, you may select ‘Sign up’ at the bottom of the Okta Sign In screen to create one. Activate your Okta account using the autogenerated email before proceeding with MontanaWorks Business Portal registration
- After successfully signing in to Okta, your name will appear in the upper right-hand corner of the MontanaWorks Business Portal screen
- Select ‘Register Your Organization’ again
- Complete fields on the Organization Registration screens as applicable (* indicates a required field)
- Note: you will be the first Point of Contact for this business or organization and have the ‘Profile Administrator’ access level. Once staff have reviewed and approved your registration, you may add other individuals as contacts
- Click ‘Submit’
- If successful, a “Success!” message will appear with the option to return to the MontanaWorks Business Portal page
- The registration must be approved by Montana Department of Labor & Industry staff before you will be able to access your Business or Organization’s Portal account. You as the Point of Contact will be emailed upon approval
If you wish to cancel your registration before it has been approved, please contact DLIWSDcustomersupport@mt.gov
-
How do I view and create my organization’s events?
Events published through the MontanaWorks Business Portal will be visible to MontanaWorks Job Seekers , who can view the event’s details and register for a time slot if there are open slots available. Participants will receive an email confirmation of their registration, and also be notified by email if their registration or the event is cancelled.
To View Events
- Log in to your MontanaWorks Business Portal account
- The Upcoming Events section of your dashboard will show up to 5 of your organization’s upcoming published events
- Click an event’s name to open its details
OR
- Click ‘Events’ in the top menu
- A list of all events by your business or organization will display
- By default, only ‘Published’ events will show
- To see events that have not been published yet, cancelled events, and/or past events, use the ‘Choose an option:’ dropdown to change the set of events shown
- Click an Event ID to open its details
To Create New Event
- On the Events List, click ‘New’
- Complete fields as applicable (* indicates a required field)
- ‘Not Published’ events will not be shown to Job Seekers
- Once an event is set to ‘Published,’ the event’s location information is locked and will no longer be editable
- The Contact(s) identified for this event will receive notifications within the MontanaWorks Business Portal regarding this event
- If you would like to add a new Organization Location to select when creating an event, a Profile Administrator access level is required to do so
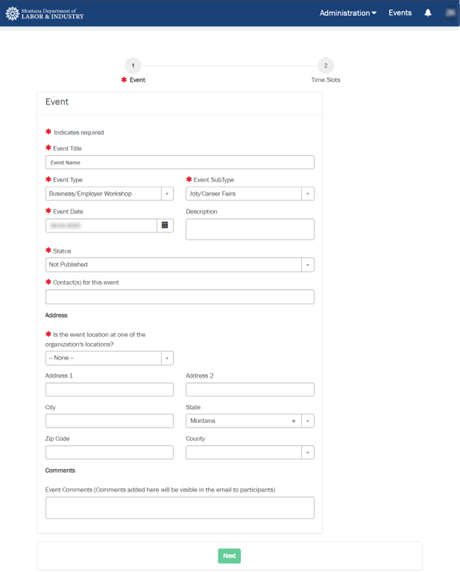
- Click ‘Next’
- Click ‘Add’ to add at least one time slot for this event
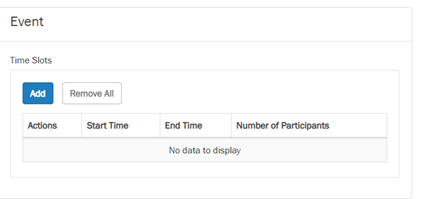
- Click 'Add’ to save the time slot
- Repeat previous steps to create additional time slots for this event as needed
- Note that all time slots must be on the day of this event. To create time slots for other days, please create additional event(s)
- The number of participants for each time slot may be edited even after the event has been published
-
How do I indicate individual attendance at my business or organization’s event?
- Open the event
- At the bottom of the event’s details screen, click ‘Event Registrations’
- Select an individual’s event registration
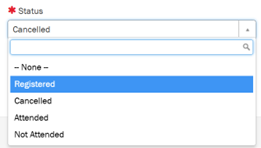
- Change the status from Registered to Attended or Not Attended
- Click ‘Submit’ to save your change
-
How do I cancel events, time slots, or individual event registrations?
To Cancel an Event
- Click 'Events' in the top menu
- Click on an Event ID to open its details
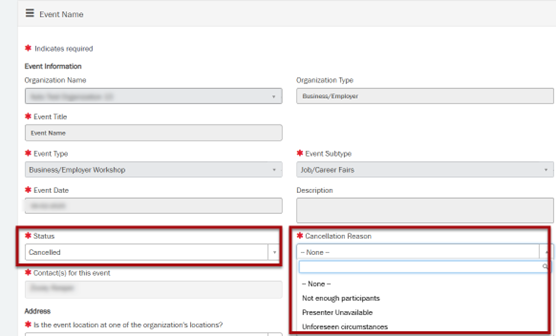
- Change the Status dropdown to Cancelled
- Choose a Cancellation Reason
- Click 'Submit' to save your change, cancel the event, and generate emails to all individuals who had been registered for any time slot for this event notifying them that their event registration has been cancelled
- This event cannot be re-published after it has been cancelled, but a new event may be created
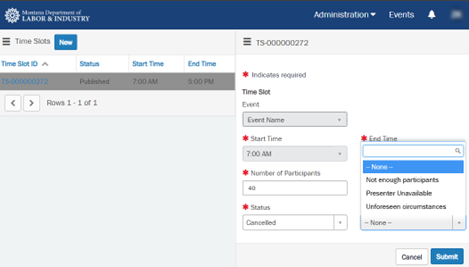
To Cancel an Event's Time Slot
- Open an event
- At the bottom of the event’s details screen, click ‘Time Slots’
- Click the Time Slot ID to open the time slot to be cancelled
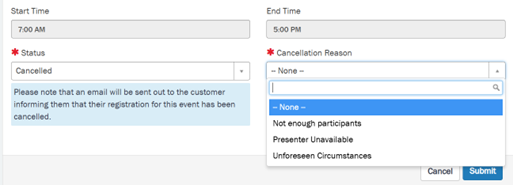
- Change the Status dropdown to Cancelled
- Choose a Cancellation Reason
- Click ‘Submit’ to save your change and generate emails to all individuals who had been registered for that time slot notifying them that their event registration has been cancelled
- This time slot cannot be re-published after it has been cancelled, but new time slot(s) may be created as needed
To Cancel an Event's Registration(s)
- Open an event
- At the bottom of the event’s details screen, click ‘Event Registrations’
- Select a specific event registration
- Change the status from Registered to Cancelled
- Choose a cancellation reason – when cancelling an individual event registration, likely ‘Unforeseen Circumstances’
- Click ‘Submit’ to save your change and generate an email notifying the individual that their registration has been cancelled
-
How do I manage my business or organization’s contacts?
A ‘contact’ for an organization can be one of three Access Levels:
'Profile Administrators' can manage the organization's details, related locations, events, and contacts. If the organization is a Montana Eligible Training Provider, the Profile Administrator will be responsible for renewing MT ETPL eligibility and updating training program details and performance data as required. There can be more than one Profile Administrator per organization
'Contacts' can manage events and event registrations and can view but not edit organization information
'No Online Access Contacts' will not be able to log in to the business portal but their access level can be upgraded at a later date
Note that in the following instructions, ‘Contacts’ generally refers to any of these three Access Levels.
To View or Update Contacts
- Log in to your MontanaWorks Business Portal account
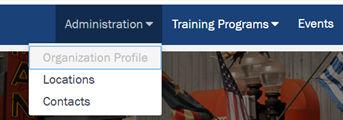
- Click ‘Administration’ in the top menu
- Select ‘Contacts’ to view the active contacts for this Business or Organization
- To view all or inactive contacts, use the ‘Choose an option’ dropdown to change the set of contacts shown
- Click a contact’s name to open and view their details
- Profile Administrators may edit a contact’s details on this screen
- Note that changes to the name and/or email address of a ‘Profile Administrator’ or ‘Contact’ can only be updated by that individual through their Okta account
- If a ‘No Online Access Contact’ is granted the ‘Profile Administrator’ or ‘Contact’ level of access, an email will automatically be sent to them
- Click ‘Submit’ to save your changes OR
- Click ‘Cancel’ to leave this screen without saving changes
To Add a New Contact
Profile Administrator Access Level Required
- Open the list of Contacts
- Click ‘New’
- Complete fields as applicable (* indicates a required field)
- Note that if this new contact will have an Access Level of ‘Profile Administrator’ or ‘Contact,’ their email must be unique to MontanaWorks Portal accounts
- Click ‘Submit’
To Deactivate or Delete a Contact
Profile Administrator Access Level Required
Deactivation removes the ability for a given Profile Administrator or Contact Access Level contact to log in to the MontanaWorks Business Portal and access any part of your Business or Organization’s account. This is reversible!
- Open the details of the active contact to be deactivated
- At the bottom of the Contact Details screen, click ‘Deactivate’
- On the Deactivation Confirmation popup, click ‘Submit’
- The contact’s status will change to ‘Inactive,’ they will be receive an autogenerated email notification that they will no longer be able to access this MontanaWorks Business Portal account
Deletion is only applicable to ‘No Online Access Contacts,’ which have a status of ‘Not Applicable’
- Open the details of the ‘No Online Access Contact’ to be deleted
- At the bottom of the Contact Details screen, click ‘Delete’
- On the Deletion Confirmation popup, click ‘Submit’
- The contact will be deleted from the MontanaWorks Business Portal. It cannot be recovered, but a new contact record could be created for this person if needed
To Activate/Reactivate a Contact’s Access
Profile Administrator Access Level Required
- Open the details of the inactive contact to be activated – or reactivated
- At the bottom of the Contact Details screen, click ‘Activate’
- On the Reactivation Confirmation popup, click ‘Submit’
- The contact’s status will change to ‘Active’ and they will now be able to access the MontanaWorks Business Portal account
-
How do I manage my organization’s locations?
To View/Edit Locations
- Log in to your MontanaWorks Business Portal account
- Under Administration in the top menu, select ‘Locations’
- A list of locations for your business or organization will display
- By default, only ‘Active’ locations will show
- To see inactive locations, use the ‘Choose an option:’ dropdown to change the set shown
- Click an Organization Location Name to view its details
Profile Administrator Access Level Required to Edit Locations
- Edit the location’s information as needed
- Click ‘Submit’ to save your changes
AND/OR
- Use the ‘Deactivate’ button to inactivate this location and all points of contact associated with it to prevent them from accessing your organization’s MontanaWorks Business Portal account
To Create a New Location
Profile Administrator Access Level Required
- From the Administration top menu, select ‘Locations’
- Click ‘New’
- Complete fields as applicable
- Click ‘Submit’ to create the new location
Eligible Training Providers
-
How do I find out more about what it means to be an Eligible Training Provider?
“WIOA established an Eligible Training Provider process that will help support and ensure informed customer choice, performance accountability and continuous improvement. States and Local Workforce Development Boards identify Eligible Training Providers qualified to receive WIOA funds to train eligible adults, dislocated workers, and youth.” Source https://www.trainingproviderresults.gov/#!/about
Click to view Montana’s Eligible Training Provider List
-
How do I apply to be an Eligible Training Provider in Montana?
You may now submit your application to be on Montana’s Eligible Training Provider List (ETPL) through the MontanaWorks Business Portal. If you have questions or want more information before applying, please contact the Program Manager at MTETPL@mt.gov.
- Ensure you have a MontanaWorks Business Portal account and log in
- See How do I create a MontanaWorks Business Portal account? for more information
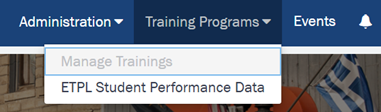
- If your organization is a Training Provider type, under the Training Programs menu option, select ‘Manage Trainings’
- If your organization is another type, you will not be able to see the Training Programs at this time. Proceed to Step 6 to continue with your Montana Eligible Training Provider application
- If your organization is another type, you will not be able to see the Training Programs at this time. Proceed to Step 6 to continue with your Montana Eligible Training Provider application
- Click ‘New’ to create a new Training Program, aka Funded Service
- Complete fields about your training as applicable
- When complete, click ‘Submit for Approval’
- Repeat previous Steps 3-5 to add all training programs you would like to submit for consideration with your application. You will be able to submit additional programs later as needed
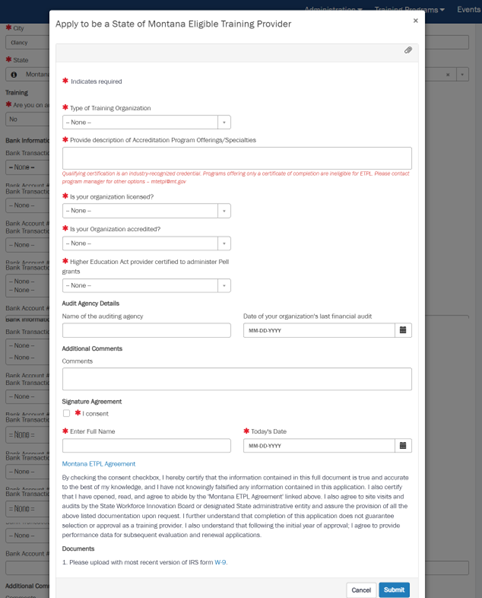
- Under the Administration menu, select ‘Organization Profile’
- Ensure your organization’s information is correct. Click ‘Submit’ to save any changes made
- Click ‘Apply to be a MT Eligible Training Provider’ at the bottom of your Organization Profile

- In one session, complete all fields as applicable
- Use the paperclip icon in the top right to upload your W-9 and if applicable, your last audit report
- Review the Montana ETPL Agreement found in the Eligible Training Provider Information DLI Training site at the link provided
- Click ‘Submit’ to send in your application
- Ensure you have a MontanaWorks Business Portal account and log in
-
How do I view the ETPL Agreement or learn more about my eligibility?
Please see the Eligible Training Provider Information on the DLI Training site to view the ETPL Agreement and additional help resources for using the MontanaWorks Business Portal to:
- manage your training programs
- submit performance data
- and more
You will be able to log in to the DLI Training site using the same Okta account that you use to access the MontanaWorks Business Portal, or a different Okta account there if you choose. If prompted, click ‘Enroll me’ in the course to gain access to all materials and receive email notifications about significant changes.
WOTC Portal
-
How do I create a WOTC Employer account?
If you already have an Okta account and want to register as a WOTC Employer/Consultant using the same email address, you will use your existing Okta credentials to sign in.
- Open the MontanaWorks WOTC Portal
- Select ‘Register as a WOTC Employer/Consultant’
- Complete fields on the Registration screen as applicable to identify you in the WOTC Portal. (* indicates a required field)
- Click ‘Submit’
If you do not have an OKTA account, follow these steps
- Open the MontanaWorks WOTC Portal
- Select Citizen Login
- Follow prompts to create a new account
- OKTA will automatically transition to WOTC portal
- Complete fields on the Registration screen as applicable to identify you in the WOTC Portal. (* indicates a required field)
- Click ‘Submit’
There is more information on registering and using the WOTC portal here
- How do I change my name and/or email?
-
Why did I receive an email from Okta.com asking me to confirm my email address?
We need to confirm your email address before we can give you access to your login.mt.gov account. We partner with Okta to provide this service securely.
Okta is a digital identity platform that helps people easily prove their identity so they can access advanced online services—while keeping their personal information safe.
Okta is a trusted MT.gov partner. Okta provides rigorous security measures and controls to protect your information. This includes securing and verifying all communications with Okta and securely storing your data.
-
How do I manage the details of my business?
Please contact the WOTC team at wotc@mt.gov if you need to change information for your business. You can change some of your personal information in the WOTC portal by clicking on your username on the right side of the header and choose My Profile. Please keep in mind that changes to your name or email address are made through OKTA https://okta.mt.gov/Help.
-
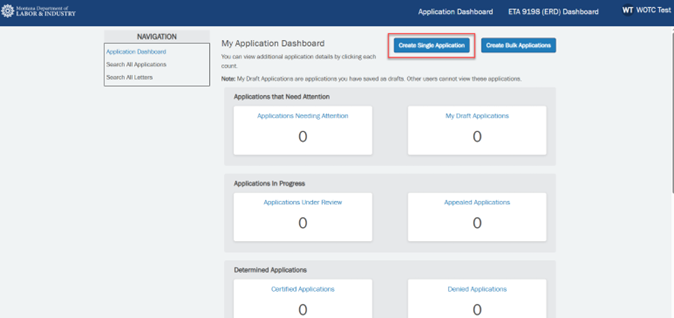
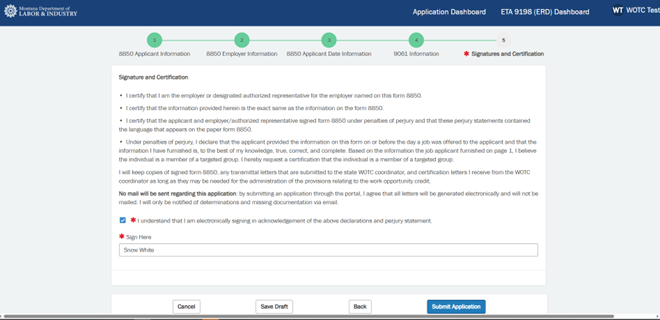
How do I submit my WOTC application?
- From the application dashboard click Create Single Application
- After entering all required information, read and sign the acknowledgement then click Submit Application
There is more information on using the WOTC portal on the Work Opportunity Tax Credit (WOTC) Training Course page.
- From the application dashboard click Create Single Application
-
How do I view/ manage my WOTC application?
From the application dashboard you can see how many applications are in each status.
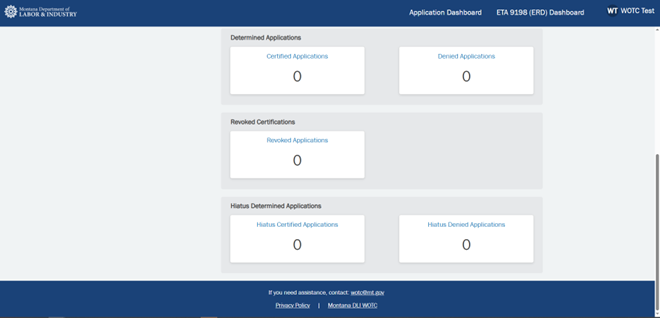
Click on the number in a status box to view those applications or click Search All Applications to view all applications
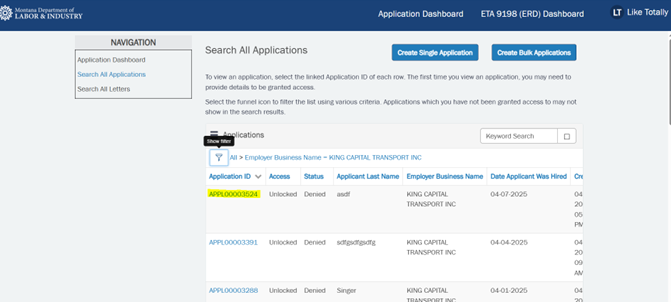
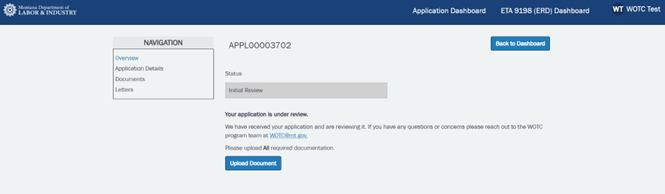
Clicking on the Application ID will take you the application overview. From here you can view application details, documents and letters associated with the application as well as upload any relevant documents.
*If you did not submit an application, you can still view this information however you will be prompted to enter certain information from the application as a security measure
There is more information on using the WOTC portal here
-
How do I find out more about WOTC?
Please visit the Work Opportunity Tax Credit page and Work Opportunity Tax Credit (WOTC) Training Course for more information and training on the new WOTC portal.
Technical Assistance
-
How do I use a smartphone to upload a document?
If you have a photo or file saved on your smartphone and log in to your portal account on your smartphone, you will be able select that photo or file to upload when you click on an ‘Add attachments’ paperclip icon in the portals
An image (photo or screenshot) of your document may be sufficient.
If a PDF of your document is desired:
- For Android or Google Drive, Google Support provides this page for how to Scan files as PDFs with your mobile device
- For iPhone, Apple Support provides this page for How to scan documents on your iPhone or iPad
-
What is Okta?
Okta is Montana's Single Sign-On (SSO) provider, allowing you to use a single account to log in to multiple State of Montana services and update your name and/or email address from one secure profile.
An Okta account is required to access any of the MontanaWorks.gov portals for Job Seekers, Businesses, or WOTC.
You are able to receive Job Service Montana services without having an Okta or any portal account. Contact a Job Service Montana office by phone, email, or in person, find a Job Service Location, or email DLIWSDcustomersupport@mt.gov for assistance.
Please see https://okta.mt.gov/help for more information.
-
How do I change my name / email on my Job Seeker, Business, or WOTC Portal?
Changes to your name and/or email address on your MontanaWorks Job Seeker Portal, Business Portal, or WOTC Portal account can only be updated by you through your Okta account. These changes made in Okta will automatically apply to your MontanaWorks account upon your next Portal login.
Please see https://okta.mt.gov/help for more information.